Maqueen Programming using Python
Unlike Makecode/Javascript programming, Python programming on Maqueen is not straight forward since there is no built-in extension.
Motor Control
Motor Control * Learning Target: Mastering the basic method of motor control. * Effect: The car forward 1 second, right turn 1 second, left turn 1 second, back 1 second, back and right turn 1 second.
Principle of Working
Motors drivers are a separate circuit on Maqueen and can be controlled via I2C protocol. Below are the associated hardware IDs for the motors to be used for controlling the motors: * M1 (Left Motor) - 0x00 * M2 (Right Motor) - 0x02
Direction of movement can be controlled to via a single bit:
- Clockwise - 0
- Counter Clockwise - 1
FInally, speed can be controlled via a value from 0-255
All of this information will be combined in a buffer, convert to a byte array and send to Maqueen via I2C.
Python Code
from microbit import *

# dfrobot maqueen motor control demo

i2c.init(freq=100000, sda=pin20, scl=pin19)

def MotorControl(motor, direction, speed):
    buf = bytearray(3)
    # control for motor (0 for M1 (L) and 1 for M2 (R)
    if motor == 0:
        buf[0] = 0x00
    else:
        buf[0] = 0x02
    # control for direction (0 for CW and 1 for CCW)
    if direction == 0:
        buf[1] = 0
    else:
        buf[1] = 1
    # set speed
    buf[2] = speed
    i2c.write(0x10, buf)

while True:
    MotorControl(0, 0, 255)
    MotorControl(1, 0, 255)
    sleep(1000)
    MotorControl(0, 0, 255)
    MotorControl(1, 0, 0)
    sleep(1000)
    MotorControl(0, 0, 0)
    MotorControl(1, 0, 255)
    sleep(1000)
    MotorControl(0, 1, 255)
    MotorControl(1, 1, 255)
    sleep(1000)
    MotorControl(0, 1, 255)
    MotorControl(1, 1, 0)
    sleep(1000)
RGB Breathing Ambient Light
- Learning Target: Learn the basic way of using ambient light.
- Effect: The RGB ambient light at the bottom of the Maqueen shows a variety of colors and presents a gradient effect.
Principle of Working
Neopixel is Adafruit’s individually-addressable RGB color pixels and strips based on WS2812, WS2811 and SK6812 LED/drivers, using single wire control protocol. Micro:bit has a build in functions on NeoPixel and can be controlled using the ‘neopixel’ module. See micro:bit’s MicroPython documentation for more details. Mawueen has 4 programmable RGB lights connected to pin15.
Python Code
from microbit import *
import neopixel
from random import randint

# need to declare pin associated with the RGB lights and the number of RGB lights
np = neopixel.NeoPixel(pin15, 4)

while True:
    for pixel_id in range(0, len(np)):
        red = randint(0, 60)
        green = randint(0, 60)
        blue = randint(0, 60)

        # Assign the current LED a random red, green and blue value between 0 and 60
        np[pixel_id] = (red, green, blue)

        # Display the current pixel data on the Neopixel strip
        np.show()
        sleep(100)
LED Light Flash
- Learning Target: Learn the using way of LED light and buzzer.
- Effect: The left and right LED lights flash alternately, and the buzzer emits two different tone frequencies at intervals of 500 milliseconds.

Principle of Working
Maqueen has 2 red LED lights connected to both sides of the robot. It is connected to pin8 (L) and pin12 (R). Use the micro:bit’s I/O functions to operate these LEDs. It also has a buzzer with is connected to pin0. It can be switch off via a physical switch on the board if you need to use pin0.
Python Code
from microbit import *
import music

while True:
  # write to red LED (pin 8 is L, pin 12 is R)
  pin8.write_digital(1)
  pin12.write_digital(0)
  music.play("C4:1")
  sleep(500)
  pin8.write_digital(0)
  pin12.write_digital(1)
  music.play("E4:1")
  sleep(500)
Read Ultrasonic Distance
- Learning Target: Learn to read the distance of ultrasound, so that later can be flexible use of these data.
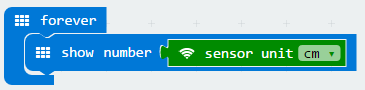
- Effect: The ultrasonic detecting the obstruction in front and the distance will be displayed on the dot-matrix screen in centimeters.
Makecode Program Link: https://makecode.microbit.org/_4gi4Dj7yTWgK
Screenshot of Makecode Graphical Program:
Read Infrared Key Assignments
- Learning Target: Learn to read the key assignments of infrared, so that later can be flexible use of these data.
- Effect: Put the the IR receiver toward the IR remote control, when you press any key on the IR remote control. The key assignments that corresponds to the pressed key will displayed on the dot matrix, in decimal notation the last two digits of the key Assignments are displayed.
Makecode Program Link: https://makecode.microbit.org/_361V7bbp0UAg
Screenshot of Makecode Graphical Program:
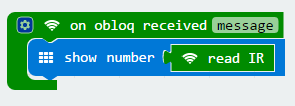
IR Remote Control and Its Key Assignments The key assignments in the following table are in hexadecimal. In this product, we read the last two digits of the key assignments and automatically convert them to decimal data.
IR Remote Control
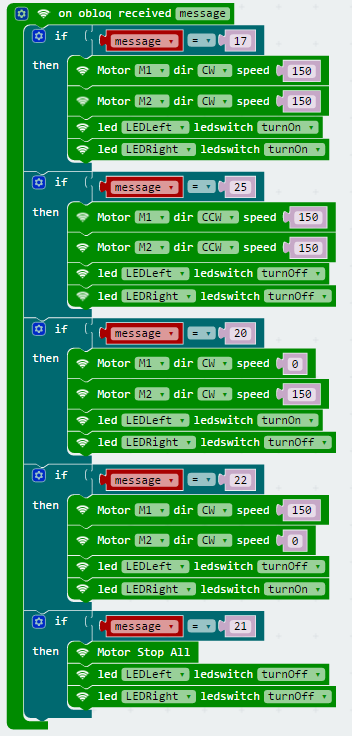
- Learning Target: Learn to use the IR remote control to command the car.
- Effect: Control car forward, left, right, back with 4 keys of IR remote control 2, 4, 6, 8.
Makecode Program Link: https://makecode.microbit.org/_MfDXhX6MM35X
Screenshot of Makecode Graphical Program:
Line-tracking
Effect: The car is running along the black line.
Principle of Working
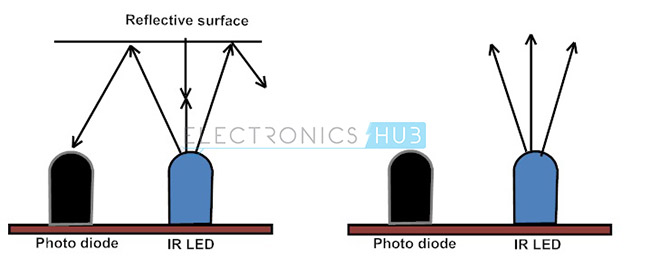
IR sensors are a class of devices that transmits and/or receives infrared radiation. As black color absorb radiation and white color reflects it, when IR LED emits radiation it will only be reflected and detected by IR receiver/photodiode when the surface is white or light colors. Black or empty surfaces will absorb or not be reflected, thus no infrared radiation will be detected.
Python Code
from microbit import *

# motor control
i2c.init(freq=100000, sda=pin20, scl=pin19)

def MotorControl(motor, direction, speed):
  buf = bytearray(3)
  # control for motor (0 for M1 (L) and 1 for M2 (R)
  if motor == 0:
      buf[0] = 0x00
  else:
      buf[0] = 0x02
  # control for direction (0 for CW and 1 for CCW)
  if direction == 0:
      buf[1] = 0
  else:
      buf[1] = 1
  # set speed, 0 - 255
  buf[2] = speed
  i2c.write(0x10, buf)

while True:
# IR sensor reads 1 if white (reflective), 0 if black (or not reflecting the infrared light)

#if pin13 (left IR sensor) reads white and pin14 (right IR sensor) reads black it will turn right
    if pin13.read_digital() == 1 and pin14.read_digital() == 0:
        MotorControl(0,0,255)
        MotorControl(1,0,0)
#if pin13 (left IR sensor) reads black and pin14 (right IR sensor) reads white it will turn left
    elif pin13.read_digital() == 0 and pin14.read_digital() == 1:
        MotorControl(0,0,0)
        MotorControl(1,0,255)
# if both IR sensors read all black it will go straight
    elif pin13.read_digital() == 0 and pin14.read_digital() == 0:
        MotorControl(0,0,255)
        MotorControl(1,0,255)
# if both IR sensors read all white, it will stop
    else:
        MotorControl(0,0,0)
        MotorControl(1,0,0)
Ultrasonic Obstacle-avoiding
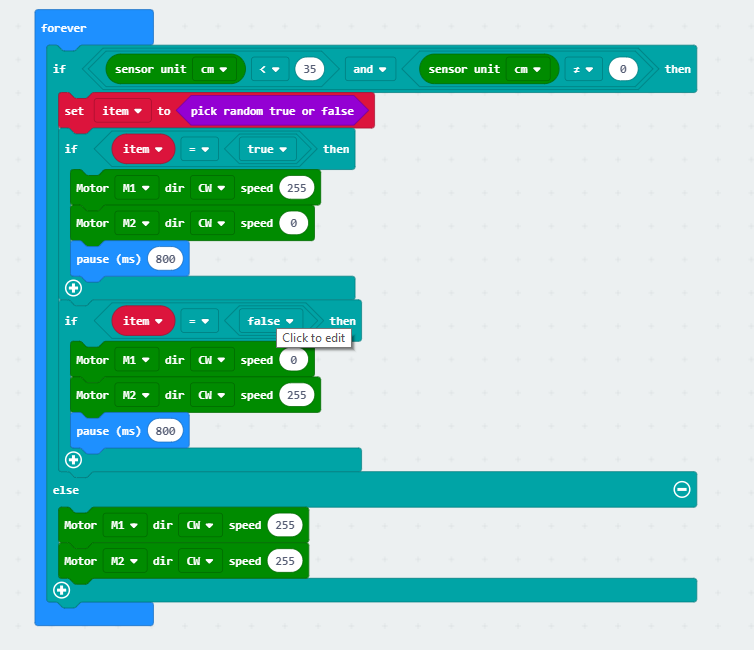
- Effect: Ultrasonic detects the distance between the car and the obstacle in front of it. If the distance is less than 35cm, the car will randomly choose to turn left or right to avoid obstacles.
- Fittings: SR04 Ultrasonic Module x 1 or SR04-P Ultrasonic Module x 1
Makecode Program Link: https://makecode.microbit.org/_Fa4Ef3DwyXW7
Screenshot of Makecode Graphical Program:
Light-operated Sprite
- Effect: The car does not move in the darker light, and as the flashlight illuminates the LED, the vehicle’s forward speed begins to increase as the intensity of the light increases.
Principle of Working
Using the display?s LEDs in reverse-bias mode, micro:bit can sense the amount of light falling on the display. Returns an integer between 0 and 255 representing the light level, with larger meaning more light.
Python Code
from microbit import *

# motor control
i2c.init(freq=100000, sda=pin20, scl=pin19)

def MotorControl(motor, direction, speed):
  buf = bytearray(3)
  # control for motor (0 for M1 (L) and 1 for M2 (R)
  if motor == 0:
      buf[0] = 0x00
  else:
      buf[0] = 0x02
  # control for direction (0 for CW and 1 for CCW)
  if direction == 0:
      buf[1] = 0
  else:
      buf[1] = 1
  # set speed, 0 - 255
  buf[2] = speed
  i2c.write(0x10, buf)

while True:
    # reads light level from 5x5 led and converts it to a value
    if display.read_light_level() > 70:
        MotorControl(0,0,display.read_light_level())
        MotorControl(1,0,display.read_light_level())

    # stop motors if the light level is below 70
    else:
        MotorControl(0,0,0)
        MotorControl(1,0,0)